Building Vue Applications with Nuxt.js
March 1, 2023

JavaScript structures/libraries like Vue provide a fantastic user experience while browsing websites. Many provide a way of dynamically changing page content without sending a request to the server each time. But, there is a problem with this approach. Initially, while loading your website, the browser doesn’t receive the complete page to display. Instead, it will send many pieces to build the page (CSS, HTML, and other files) and guide how to place it together.
It takes a significant amount of time to place this entire information together before browsing that has something to show. It is similar to sending a bunch of books and a flat–pack bookcase. It means you must build a bookshelf first and then place the book inside. Have a version of the framework/library on the server that can prepare ready – to – display page. After that, send this whole page to the browser, with the ability to make alterations and still have dynamic page content. Besides this, there are various benefits. For instance, a page that rarely changes, like about us, must not be recreated every time. A server can create it once, cache it, and store it for future reference.
In this blog, we elaborate step by step process of building Vue applications with Nuxt Js.
Why Nuxt Js?
Nuxt.js is the implementation for SSR for the well-known React library, next. After observing the benefits of this approach, the implementation was developed for Vue named Nuxt. Anyone familiar with using Vue’s React+Next combination will notice several similarities in the style and design of this app. But, Nuxt offers Vue-specific features to make a powerful and versatile SSR application for Vue.
Nuxt was updated to a production-ready 1.0 Version in January 2018. It is now part of a vibrant, well-supported, and well-funded community. One of the best things about Nuxt is that developing projects with Nuxt isn’t a massive difference from the creation of the typical Vue project. It offers many options that let you create well-structured codebases quickly.
Another thing to remember is that Nuxt does not need to be used in SSR. It’s marketed as a tool for the creation of universal Vue.js applications. It has an option ( nuxt generate) to generate static Vue applications that utilize a similar code base. If you’re worried about getting into SSR but aren’t concerned, don’t be. You can make a static website and still utilize Nuxt’s capabilities.
Let’s build an easy project to grasp the possibilities of Nuxt and Nuxt fully generate. The source code of this particular project is available on GitHub. If you’d like to look it up, you can look at an actual version made using the nuxt generator and host by Netlify.

Steps to build Vue Application with Nuxt Js
1. Set up Nuxt Project
For building the project and adding Vuetify to Nuxt application, follow the mentioned steps:
1. Run the CLI initialization command – npx create –nuxt –app
2. Other options
• Project name: nuxt-vuetify
• Programming language: JavaScript
• Package manager: npm • UI Framework: None (we’ll manually add it in step 2)
• Node.js modules : pick Axios
• Remaining option will remains as default
• Run the application – npm run dev
2. Set up Vuetify
We’ll build the framework of this project off the Nuxt boilerplate we constructed during the two parts of this series.
Installing Vuetify using Nuxt
To include Vuetify in the Nuxt application, follow these steps:
1. Run npm install: npm install @nuxtjs/vuetify – D
2. Then add Vuetify modules in nuxt. Config.js buildModules element – buildModules: [‘@nuxtjs/vuetify’]
After that you can use any Vuetify element.
Vuetify layout basics
The V-app element is necessary for the majority of Vuetify applications. It aids with bootstrap styling and provides support for cross-browser compatibility. We can put any component in the library of components into it in the following manner:
<v-app>
<v-container>Hello world</v-container>
</v-app>
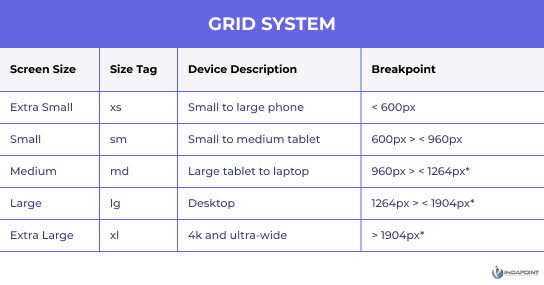
Grid System
Vuetify comes with a 12-slot grid system, which is built by using flexbox. This enables us to design flexible layouts using the breaking points:
<v-main>
<v-container>
<v-row
class=”py-8″
justify=”center”
>
<v-col
cols=”12″
>
<v-card>
<v-data-table
:headers=”headers
:footer-props=”footerProps”
:items=”gorillas”
:items-per-page=”5″
class=”elevation-1″
>
<templatev-slot:[`item.actions`]=”{ item }”>
<v-icon
small
@click=”removeGorilla(item)”
>
mdi-delete
</v-icon>
</template>
<templatev-slot:[`item.imageUrl`]=”{ item }”>
<divclass=”p-2″>
<v-img:src=”item.imageUrl”:alt=”item.name” height=”100px” width=”100px”></v-img>
</div>
</template>
</v-data-table>
</v-card>
</v-col>
</v-row>
</v-container>
</v-main>
…
<script>
export default {
data(){
return {
gorillas: [
{
name:’Gorilla Logic’,
description:’Unstoppable Gorilla Band’,
imageUrl:’https://gorillalogic.com/wp-content/uploads/2018/08/GL_Logo_Primary_Wht_500-1.png’
}
],
headers: [
{
text:’Image’,
value:’imageUrl’,
sortable:false
},
{
text:’Name’,
value:’name’,
width:’150px’
},
{
text:’Description’,
value:’description’,
sortable:false
},
{ text: ‘Actions’, value: ‘actions’, sortable: false },
],
footerProps: {
‘items-per-page-options’: [3, 5, 10],
},
}
}
}
So, we divide each section.
Props
: headers=”headers”
: items=”gorillas”
: items-per-page=”5″
The data table comes with various tools that let us use the built-in functions and tailor them to more specific scenarios. It is possible to bind the headers to decide how data will be displayed, the types of items we would like to show in the table, and pagination options like the number of items displayed on a page.

Headers
headers: [
{
text:’Image’,
value:’imageUrl’,
sortable:false
},
{
text:’Name’,
value:’name’,
width:’150px’
},
{
text:’Description’,
value:’description’,
sortable:false
},
{ text: ‘Actions’, value: ‘actions’, sortable: false },
Headers decide how an attribute is presented on the table; for example, align options, whether or not the object can be sorted, the text displayed in the header, and the name of the attribute inside the object.
Items
The array of items is a fundamental and flexible object, with the data appearing on the table. This lets us do many things, like filtering and choosing the current items.
Slots
Vuetify lets us configure the entire database table. This is done using slots. In the example above, we utilized the item. a slot included in the data table component allows you to set how a picture attribute appears.
Conclusion
Nuxt is rapidly evolving, and that’s just one of the features offered. We hope this article inspires you to test it and see if it can aid in the improvement you can use in your Vue applications, allowing you to build more quickly and make the most of the powerful capabilities of Nuxt.

Custom AI-Powered Applications to Future-Proof Your Business
15+
Years of Experience
100+
Dedicated Developers
98%
Client Retention
60%
Cost Saving
1200+
Project Completion


