Continuous Integration and Deployment (CI/CD) for PHP Symfony application with AWS
March 16, 2020
Continuous Integration is becoming a de-facto standard in today’s software industry. Many organizations have successfully used CI/CD to continuously integrate code from various developers and deploy it on dev/integration/production environments. There are several benefits to this approach, like,
- Developers can quickly find out integration errors and feedback about their work.
- They save time they would otherwise spend on manual integration and uploads.
- Dev/UAT environment is always up to date for developers, QA, and reviewers.
PHP applications are slightly different when it comes to CI/CD as it does not need a compilation of code before deployment. Last month, we got a challenge from one of our customers to implement Continuous Integration (CI) and Continuous Deployment process for one of their legacy PHP Symfony projects. We had the following challenges in front of us to solve.
- It was a legacy PHP project.
- It couldn’t be updated to the latest version of PHP.
- We cannot update the Symfony version to the latest.
We started our brainstorming with a couple of options we had in our mind, and based on our experience and request from a client, we first tried Bitbucket as a version control tool, BuildKite as a build tool AWS S3 to store .zip bundle created by BuildKite.
However, to increase efficiency and keep all tools under the same umbrella, we went to our best friend AWS and successfully achieved our desired goals.
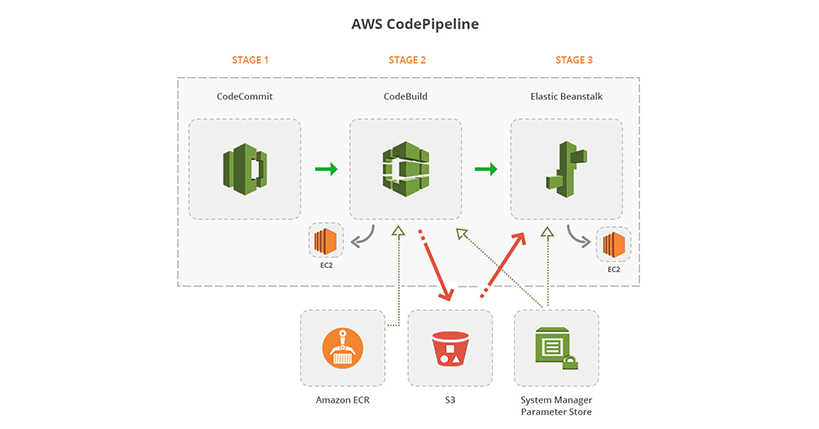
We used a few AWS services to achieve this.
- CodeCommit – Repository for the codebase. (Version Control)
- CodePipeline – To automate pipeline. (Build)
- CodBuild – To install all dependencies and generate a .zip bundle that is ready for deployment. (Integration and Unit Test)
- Elastic Beanstalk – To deploy the application on Dev/UAT server. (Deploy)
- Amazon Elastic Container Registry (Storage for Docker image)
- AWS Systems Manager Parameter Store (Storage for Configuration Data)
CodeCommit
We will not go into details of how to set up a repository in CodeCommit. This should be reasonably simple. CodePipeline also supports other Git-based services like GitHub and BitBucket. So you can use any of these version control tools.
CodePipeline
Our CodePipeline has three stages – Source, Build, and Deploy.
Step 1 – Source
- Create a new CodePipeline, and in the first step, it will ask for name and service role. You can create a new service role or use an existing one.
- In the next step, you can select your source provider. Select AWS CodeCommit here.
- You will now see your repository and select the one you would like to use.
- Then you can see your branches. Select the department you would like to connect with the pipeline. Whenever code is pushed to the selected branch, it will trigger this pipeline.
Step 2 – Build
- In the build stage, we will install all dependencies for a Symfony project. It will give us a .zip bundle almost ready to be deployed. The purpose of the build stage is to reduce deployment time on Dev/UAT server.
- During the build, step enters the name, select CodeBuild as build provider, select region, and Input Artifact. Input Artifact is produced by the Source step and provided as input to the build stage.
- Click on Create Project button to create a new CodeBuild project. You can see steps to develop the project below in the CodeBuild section.
- You can enter the Output Artifact name, which will be used as input for the next step.
- CodeBuild is a managed service, so an instance will start, get the source code, build it according to commands we write in buildspec.yml (details below), create a .zip file of source, and copy it to S3.
- For those who have not used AWS managed service before, this instance will not be visible in the EC2 console. It will start, do its job and terminate. You can’t see or connect to it like a regular EC2 instance.
Step 3 – Deploy
- When you are done with the build step, the third and last stage is Deploy. Select Elastic Beanstalk as the provider and select your region.
- Select the input artifact, which is essentially the output artifact from the build step.
- Then you will be asked to select the Beanstalk application name and environment. Please find detail below on how to create them.
Now we will look into details of how to set up the CodeBuild project and Beanstalk environment.
CodBuild
Creating a CodeBuild new project
- You can create a new project during pipeline creation or create it ahead of time and select it in the pipeline. Below you will find details about each step of the project.
- Project configuration – You can enter a project name in this section.
- Environment – We are going to use a Docker image we have pushed to Amazon ECR. Please refer to the screenshot below. You can also use your own Docker image preconfigured with the software you will need in the build phase or use managed images provided by CodeBuild.
- Build spec – Choose the “Use a build spec file” option as we are going to use a buildspec.yml file specifying build commands.
- Logs – Choose “CloudWatch logs” as it will help debug when the build step fails.
Buildspec.yml
This is the file we need to create at the root of our project folder. We will write build commands in this file.
Below is our buildspec.yml file.
- The Env section has some variables which are needed during the build. They have been stored in the AWS parameter store, and we are referring to them here. As our application has an old version of Symfony, we need to prefix variable names with “SYMFONY__”. For newer versions, they should be written as “%env(DATABASE__HOST)%.” You can find more details about connecting to a database here.
- Under phases, we have build and post_build commands. Under the build section, we are installing npm and composer dependencies. We are also compiling CSS using “ npm run dev.”
- Under the post_build section, we are removing some folders needed in the deployment bundle, deleting Symfony cache, giving permissions to cache and logs folder, and then running some unit tests. Replace “<Project Name>” with your actual project name.
- We are giving a pattern that will generate a .zip bundle by recursively going through the project directory under the artifacts sections.
- It’s important to note that if CodeBuild is under VPC, it will not have internet access. CodeBuild server is launched with private IP only, so it can’t access the internet. If there are commands that download some stuff from the Internet, it should not be launched in VPC. If it must be launched in VPC, a NAT gateway will be needed to allow it internet access.
Once the build stage is completed successfully, a .zip file of the source will be generated and copied to an S3 bucket.
Elastic Beanstalk
Elastic Beanstalk will take the .zip file from S3 and deploy it on an EC2 server. We will also run a few commands which are necessary to run a Symfony application. However, we try to keep it to the minimum to reduce deployment time.
We created the Beanstalk environment by following this AWS guide.
Creating an environment
- AWS provides a pre-configured link to create a load-balanced environment. Use this link to quickly get started.
- Once the environment has been created, Configuration > Software is the most important area. Here you can specify “Document Root.” For Symfony applications, it needs to be /web. You can also pass environment variables like database connection parameters and others from here. Beanstalk will make sure they are available as Symfony environment variables.
- Apart from Software, there are other configurations available which you can review and adjust as necessary.
- There is a section for the Database also. You can specify details for RDS here, and Beanstalk will create that RDS. But, it’s recommended to use external RDS in dev or production sites. This is because when the Beanstalk environment is deleted or re-deployed for some reason, RDS may also be deleted. This is not desired in most dev/production environments.
.ebextensions
- We need to create a folder “.ebextensions” at the root of our project directory. Beanstalk reads files in this folder and executes commands from those files.
- We created a set of files here to perform different deployment tasks.
- Beanstalk first deploys the application in a staging folder called “on deck”. So all commands we write in .ebextensions files are executed in that folder by default. If the deployment is successful, the ondeck folder’s contents are copied to the “current” folder, which is where the application runs.
- We have to run “after” the application is deployed in the “current” folder. For that, we are creating a file under “/opt/elasticbeanstalk/hooks/app deploy/post/” directory. This is the folder created and used by Beanstalk for its internal post-deployment commands. When we make a file here, it will be executed by Beanstalk along with its powers.
- “source /opt/elasticbeanstalk/support/envvars” is used to make environment variables available to commands following it.
- Then we are running commands to clear cache, change folder permissions, and installing assets.
- In our case, during composer install, it was creating a folder “bundles” in /web directory. It has symlinks to other files. These symlinks are not transferred with artifacts generated by CodeBuild. So we had to add the following command to the post-deployment script to regenerate those symlinks in the “current” folder.
- Here we have added 2 types of commands. First, we run database migrations. As you might have noticed this command is run under the staging directory “/var/app/ondeck”.
- Then we run unit tests. “ignore-errors: false” instructs Beanstalk to exit with “Fail” status if unit tests fail. This means, the deployment will be aborted, and the new version of your application will not be deployed if unit tests fail.
- If unit tests need a database, make sure you have “parameters_test.yml” modified to get the correct database parameters.
Mapping the Beanstalk environment with a domain
- Create CNAME in the domain control panel, which points to the Beanstalk environment domain.
- If the domain is secure, add 443 listeners in load balancer settings in the Beanstalk environment.
We hope you enjoyed reading this blog, and it will help your CI/CD project. If you want to automate your development and deployment process through Amazon Web Services and PHP Symfony Services, please contact us.


